Welcome!

This is my journey in keeping my family happy and healthy.
In this day and age, what parent knows best what to do and how to care for their family?
There are so many conflicting ideas, so much wisdom, and so many paths.
It is here that I will compile information on what I have learned and the choices I am making.
Maybe my path will help others.... or not. Enjoy!

Pages

Friday, September 23, 2011

Not so HEALTHFUL RECIPES: Honey Coconut Vanilla Cupcakes


Okay, so I have to admit I eat junk too. And this is one such recipe that fills that niche. I needed to make a quick recipe for cupcakes and here it is....


I used this RECIPE and modified it to my liking and came up with this:

1/2 cup brown sugar
1/3 cup honey
1/2 cup coconut oil
2 eggs
1 tablespoon of vanilla extract
1 1/2 cups all-purpose flour
1 3/4 teaspoons of baking powder
1/2 cup coconut milk

Preheat oven to 350 degrees and then line your muffin pan with muffin papers.

In a medium bowl, combine brown sugar, honey & coconut oil. Mix with hand mixer or electric mixer. I find it's fluffier if I use one of these than if I whisk by hand.

Then beat in eggs, one at a time.

Combine flour and baking powder, and then add to mixture and blend.

Then lastly, mix in coconut milk until creamy.....

Fill 12 muffin cups just over half way. You should be able to use up all the batter into these tins. And cook for 20-25 minutes. Keep an eye on them so that they do not overcook. You will know they are done when they are golden and your tester comes out clean when inserting into the middle of the cupcake.

These are oh so yummy!! The honey-vanilla-coconut flavor makes a delicious slightly complicated flavor that makes you go back over and over for more!!

We eat these plain because they are delicious just as they are. But you can also add a yummy glaze on top.

Honey-Vanilla-Coconut Glaze

Powdered sugar
Honey
Vanilla
A touch of coconut milk

You mostly want the powdered sugar with very little of the other ingredients to moisturize it and make it syrup-y. Don't make it too runny or it will run right off your cupcakes! You want it to be just runny enough to apply but still stays in one place.

If you want a healthier version of the cupcake recipe.... here is one I attempted that turned out delicious!!

1/2 cup brown sugar
1/2 cup honey
1/2 cup coconut oil
2 eggs
1 tablespoon of vanilla extract
3/4 cup all-purpose flour
1/2 cups whole wheat flour (I freshly ground mine)
1/4 cup of ground flax seeds
1 3/4 teaspoons of baking powder
1/2 cup coconut milk (plus a dash more water to compensate for the oats)
1 cup uncooked old fashioned oats

You will end up filling more than the 12 muffin cups. I ended up filling 3 more.

I think you can really use the top recipe as a starting point and make any changes you want!! Maybe add cinnamon, or other spice... or dried fruit... the sky is the limit!! I think next time I'll add some shredded coconut. :)

Note: all the pictures are of the "healthier" version of this recipe, with the oats and other goodness...


Tuesday, September 13, 2011

HEALTHFUL RECIPES: An Improvement on my Sourdough Recipe


I have been wanting to perfect a sourdough bread recipe so that I could make it quickly and easily and not think too much about it. A recipe I could call my own. I've been scouring the web for all sorts of recipes, reading all sorts of pointers. Now I had to find a recipe that would take into consideration I have a 2 year old and don't want to dedicate my day to baking bread. And something that wouldn't be too fussy, because then I'd just end up messing it up! A recipe that had easy measurements... not something I had to weigh and measure too stringently. Something I could basically throw together and it would generally work every time. Something I could remember without checking my recipe book every minute......

My favorite recipe is this one here. Funny enough, it's for "Basic Sourdough Bread." I tweaked it a bit and this is what I came up with:

2 cups starter (100% hydration)
1 cup freshly ground whole wheat
2 cups all-purpose flour
2 tablespoons of olive oil
2 teaspoons of salt
4 teaspoons of sugar

....and mix! And knead! And let rise.... (anywhere from 1-3 hours)

Then form into loaves.... and rise again!

And then bake....

They say to bake it at 400 degrees for 25 minutes, but I really like the effects of baking it at 375 degrees for 40 minutes. They also have you do a bunch of other steps, which I just completely eliminated (I'm lazy and busy you know!). I did however, leave a tray of water underneath as I was baking.....

Don't forget to slice the top to allow for more rising before you bake it!!!

One time I also added 2 tablespoons of Italian Seasoning. Yummy!! What a great savory bread!

You can also use this bread for making French Toast, however, do not use the savory version!! The French Toast turned out delicious. :) But that will be another recipe....... ENJOY!!


This blog is linked to Kelly the Kitchen Kop's Real Food Wednesday blog carnivale.

Wednesday, September 7, 2011

My First Harvest.... Broccoli!!!

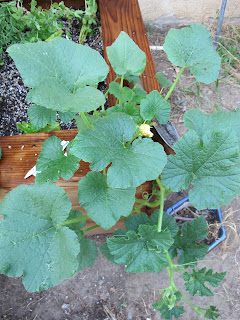
It's amazing how much you learn about gardening while you're doing it! There's a learning curve for sure. I had no idea how big some of these plants actually get and how much space they really need to grow. So as you can see, my garden bed was packed!!!


But I think that's also part of the pleasure, is the surprise at what happens each day. I think I might have harvested my broccoli slightly early, but I was afraid to wait too long and have it bolt on me. The days have been really hot, and it was a surprise to me that my broccoli would still be growing so happily in the middle of summer. I'll be interested to see it grow in other parts of the year.


The only bane to my broccoli was aphids I think. At least that's what my husband called them. Though I thought aphids looked different. These looked like powdery scaley little bugs. And they were on all the undersides of my front broccoli. I sprayed them off with a hose every day. But what I didn't realize is that they'd gotten into the head of one of my broccoli, and I didn't find out until it was cooked! YUCK! I did my best to remove them but I'm sure we ate some. Luckily they only infested one head, not all. Next time I will do things differently.

Has anyone dealt with these guys? What did you do? I would love some input!!!

Here's some more pictures of my garden.......


Related Posts Plugin for WordPress, Blogger...